GROUPON GUIDE TO CHICAGO
DIY: Sew Your Own Beer Koozie
Oct 8, 2013
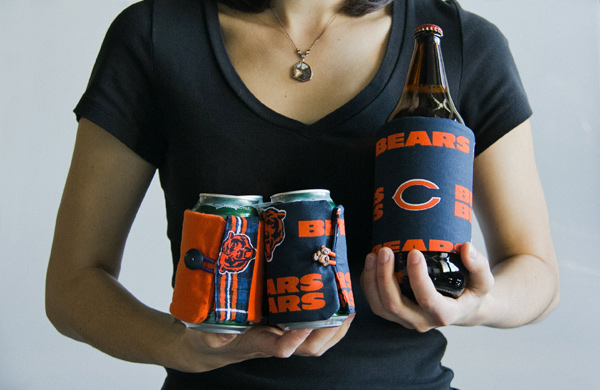 A few phrases are like nails on a chalkboard when uttered during football season. “Bears fumble” and “Cutler sacked” probably top the list, but “warm beer” comes in at a close third. Luckily, there’s an easy way to keep your game-day brew at the perfect temp and cheer on your team at the same time: a football-themed beer koozie. Best of all, you can complete this customizable DIY project in less than an hour and be back on the couch in time for kickoff.
What You Need:
A few phrases are like nails on a chalkboard when uttered during football season. “Bears fumble” and “Cutler sacked” probably top the list, but “warm beer” comes in at a close third. Luckily, there’s an easy way to keep your game-day brew at the perfect temp and cheer on your team at the same time: a football-themed beer koozie. Best of all, you can complete this customizable DIY project in less than an hour and be back on the couch in time for kickoff.
What You Need:
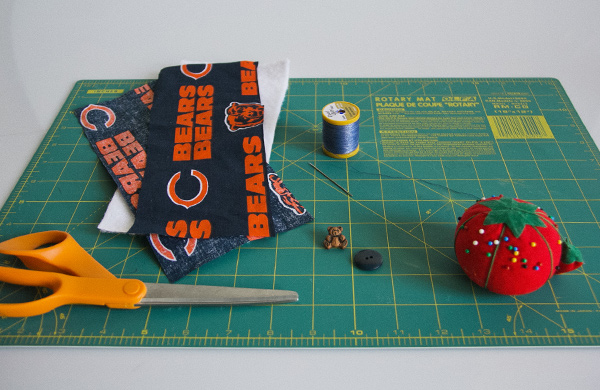 Measuring tape or ruler
Two 4.5”x10” cuts of fabric (preferably in your favorite team’s colors)
One 4.5”x10” cut of Insul-Bright
One decorative button
One elastic hair tie
Thread
Hand-sewing needle
Pins
Scissors
Sewing machine
What To Do:
1. With a threaded hand-sewing needle, sew the button onto the right side (design facing you) of one fabric rectangle. For correct placement, make sure the button is 1” from the right edge, and exactly halfway between the top and bottom of the rectangle (in this case, right at the 2.25” mark).
Note: Any old junk-drawer button will work, but if you’re looking for something with a little character, try Soutache in Bucktown.
2. Stack your fabric layers and Insul-Bright in the following order: Insul-Bright on the bottom, button-less fabric rectangle (right side up), then the fabric with the button (wrong side up). Make sure the designs on both pieces of fabric will be facing the same direction when sewn. Pin securely around the edges.
3. Using the sewing machine, sew a straight stitch ¼” from the edges on all sides. Leave 2” open on the button-less side so you can turn the koozie right-side out.
4. Clip the corners close to the seam line to prevent extra bulk. Turn your koozie right-side out, and gently push out the corners from the inside—the eraser end of a pencil works well for this.
5. Now it’s time to sew on the elastic hair tie, finishing the final seam in the process. First, wrap your koozie around a can to determine how much elastic you’ll need to loop around the button. Once you’ve determined this, pinch the elastic to create your loop and place the raw ends into the opening on the button-less side of the rectangle, directly opposite the button. Make sure all raw edges are tucked in, and sew a straight stitch down this edge, closing the opening, and backstitching over the elastic to secure it.
6. Clip any excess thread, fasten around your favorite canned beverage, and enjoy!
Measuring tape or ruler
Two 4.5”x10” cuts of fabric (preferably in your favorite team’s colors)
One 4.5”x10” cut of Insul-Bright
One decorative button
One elastic hair tie
Thread
Hand-sewing needle
Pins
Scissors
Sewing machine
What To Do:
1. With a threaded hand-sewing needle, sew the button onto the right side (design facing you) of one fabric rectangle. For correct placement, make sure the button is 1” from the right edge, and exactly halfway between the top and bottom of the rectangle (in this case, right at the 2.25” mark).
Note: Any old junk-drawer button will work, but if you’re looking for something with a little character, try Soutache in Bucktown.
2. Stack your fabric layers and Insul-Bright in the following order: Insul-Bright on the bottom, button-less fabric rectangle (right side up), then the fabric with the button (wrong side up). Make sure the designs on both pieces of fabric will be facing the same direction when sewn. Pin securely around the edges.
3. Using the sewing machine, sew a straight stitch ¼” from the edges on all sides. Leave 2” open on the button-less side so you can turn the koozie right-side out.
4. Clip the corners close to the seam line to prevent extra bulk. Turn your koozie right-side out, and gently push out the corners from the inside—the eraser end of a pencil works well for this.
5. Now it’s time to sew on the elastic hair tie, finishing the final seam in the process. First, wrap your koozie around a can to determine how much elastic you’ll need to loop around the button. Once you’ve determined this, pinch the elastic to create your loop and place the raw ends into the opening on the button-less side of the rectangle, directly opposite the button. Make sure all raw edges are tucked in, and sew a straight stitch down this edge, closing the opening, and backstitching over the elastic to secure it.
6. Clip any excess thread, fasten around your favorite canned beverage, and enjoy!
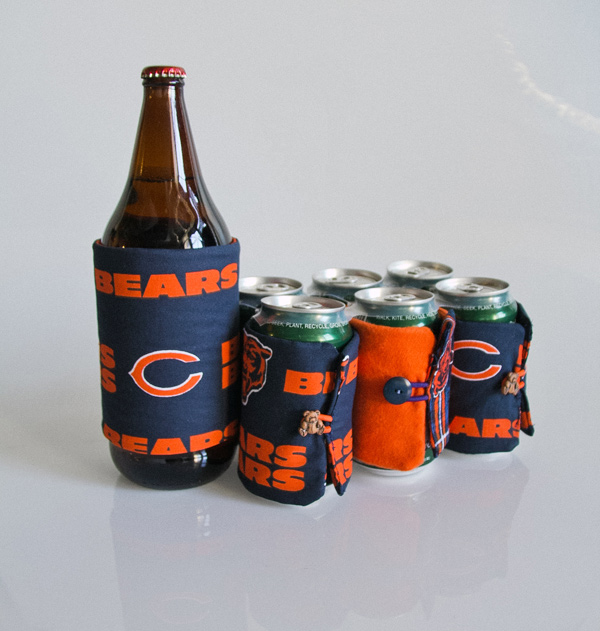 This project is made to fit a standard 12-ounce can. You can adjust the measurements and number of buttons accordingly for bottles, mini-kegs, or any other vessel you use to drink beer.
Photo: © Stephanie Anderson, Groupon
This project is made to fit a standard 12-ounce can. You can adjust the measurements and number of buttons accordingly for bottles, mini-kegs, or any other vessel you use to drink beer.
Photo: © Stephanie Anderson, Groupon BY:
Deals in Chicago

AMC: Yellow Tickets & Snacks – Experience big-screen magic Anytime!
108 North State Street, Chicago • 2.6 mi
25% discount_off
$5.03 with_code SHOWTIME
AMC Theatres
Dive into Endless Gaming with $25, $50, or $100 of Arcade Game Play at Ignite Arcade (Up to 35% Off)
8125 Skokie Boulevard, Skokie • 13.3 mi
25% discount_off
$15 with_code GROUPON
Ignite Arcade
Up to 63% Off Admission to SeaWorld Orlando
7007 Sea World Drive, Orlando
51% discount_off
SeaWorld Orlando
Deals in Chicago Other Deals in Chicago

Trending
Unleash the Fun: 50% Off Arcade Game Card at Lucky Strike
322 East Illinois Street, Chicago • 3.3 mi
50% discount_off
$20 with_code GROUPON
Lucky Strike
Trending
Gather Friends or Family: Up to 4 Movie Tickets on Offer!
1001 W 75th St., Woodridge • 20.1 mi
44% discount_off
$4 with_code GROUPON
Hollywood Blvd Cinema
Trending
Chuck E. Cheese Family Play & Pizza Package!
5030 S KEDZIE, CHICAGO • 4.3 mi
43% discount_off
Chuck E. Cheese
