GROUPON GUIDE TO CHICAGO
DIY: Crafty Ways to Revamp Old Shoes
BY: Amelia Buzzell |Sep 24, 2013
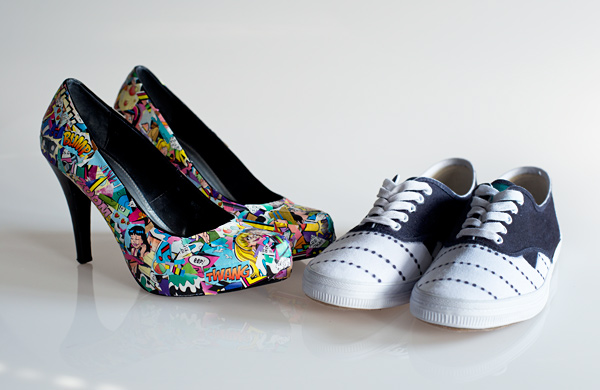 When a high heel scuffs beyond repair or a once-white pair of sneakers fades to ecru, many are doomed to the dumpster. But all it takes is a few simple craft materials to rescue shoes from the trash or a life in the back of the closet. These two step-by-step guides help inject some new life into old shoes, one for sneakers and one for heels.
SNEAKERS
When a high heel scuffs beyond repair or a once-white pair of sneakers fades to ecru, many are doomed to the dumpster. But all it takes is a few simple craft materials to rescue shoes from the trash or a life in the back of the closet. These two step-by-step guides help inject some new life into old shoes, one for sneakers and one for heels.
SNEAKERS
 WHAT YOU NEED:
Sneakers, preferably white
Tape (we used Scotch)
Permanent markers
Scissors
Sealant (optional)
WHAT YOU NEED:
Sneakers, preferably white
Tape (we used Scotch)
Permanent markers
Scissors
Sealant (optional)
 WHAT YOU DO:
1. Pick a design. Color in the midsection like a saddle shoe (as shown) or add a geometric pattern all over.
2. Remove the laces.
3. Apply tape. Leave enough room for the tip of your Sharpie in between each row. Aim for—but don’t stress out over—symmetry as you work.
4. Begin dots. Freehand a row of polka dots in between the tape, beginning near the toe. Be careful with that first row—the number of dots, as well as their size, will dictate how the rest of the shoe looks. When the first row is finished, mimic those beginning dots on the subsequent rows as best you can. If the marker bleeds slightly in between the dots, rejoice instead of fretting, as it can add a cool stripe effect.
5. Remove tape. Admire how (relatively) symmetrical it all turned out.
6. Color in midsection (optional). Make a conscious decision to include or exclude the seams as you color. This shoe included the seams.
Note: If something goes wrong while coloring the midsection, improvise. During this particular DIY session, one stray marker stroke from the saddle-shoe midsection escaped into a row of dots. The solution? Turning the stray mark into a triangle to create a tuxedo effect, which was repeated on the opposite side.
7. Color the tongue. Again, including or excluding the seams are up to you. Add a contrasting color for fun, if you like.
8. Spray with sealant (optional). Protect your handiwork with the clear, fabric-safe spray sealant of your choice.
9. Put laces back in. Strut in style.
HEELS
WHAT YOU DO:
1. Pick a design. Color in the midsection like a saddle shoe (as shown) or add a geometric pattern all over.
2. Remove the laces.
3. Apply tape. Leave enough room for the tip of your Sharpie in between each row. Aim for—but don’t stress out over—symmetry as you work.
4. Begin dots. Freehand a row of polka dots in between the tape, beginning near the toe. Be careful with that first row—the number of dots, as well as their size, will dictate how the rest of the shoe looks. When the first row is finished, mimic those beginning dots on the subsequent rows as best you can. If the marker bleeds slightly in between the dots, rejoice instead of fretting, as it can add a cool stripe effect.
5. Remove tape. Admire how (relatively) symmetrical it all turned out.
6. Color in midsection (optional). Make a conscious decision to include or exclude the seams as you color. This shoe included the seams.
Note: If something goes wrong while coloring the midsection, improvise. During this particular DIY session, one stray marker stroke from the saddle-shoe midsection escaped into a row of dots. The solution? Turning the stray mark into a triangle to create a tuxedo effect, which was repeated on the opposite side.
7. Color the tongue. Again, including or excluding the seams are up to you. Add a contrasting color for fun, if you like.
8. Spray with sealant (optional). Protect your handiwork with the clear, fabric-safe spray sealant of your choice.
9. Put laces back in. Strut in style.
HEELS
 WHAT YOU NEED:
Comic book(s)
Mod Podge in Satin Finish
Newspaper
Old pair of heels
Scissors
Sealant (optional)
Sponge paintbrush
WHAT YOU NEED:
Comic book(s)
Mod Podge in Satin Finish
Newspaper
Old pair of heels
Scissors
Sealant (optional)
Sponge paintbrush
 WHAT YOU DO:
1. Cut up comic-book pages into small pieces. Although there’s no correct way to cut the paper, irregular triangle shapes seem to work the best when collaging them onto the heels.
2. Clean heels, then apply Mod Podge. Mod Podge works best on relatively clean, vinyl heels. To be safe, take a wet cloth to the shoes and wipe away any dirt or scratches. Once clean, use a sponge paintbrush to apply a thin, even layer of Mod Podge to one section of one heel.
3. Collage paper pieces onto the heels. While the glue is still wet, apply one comic-book piece to the surface of the heel with your fingers. Then, using your index finger or the sponge paintbrush, smooth the paper onto the shoe, gently easing out any bubbles that form underneath.
Note: Excess buildup will occur when using your fingers to apply the adhesive over the paper. Like traditional white glue, this adhesive can easily be pulled off the skin or removed with a good soap-and-water scrubbing.
4. Continue to apply Mod Podge and paper pieces until both heels are covered.
5. Finish with sealant. Choose to seal the paper with a thin layer of Mod Podge, which doubles as a sealant and finish, or an aerosol sealant such as Krylon Crystal Clear Acrylic sealant spray.
For extra protection against the elements, both sealants can be used. First, apply a few layers of Mod Podge, letting each application dry, and then finish with a spritz of aerosol sealant and let dry overnight.
6. Click heels for joy.
Sara Tremblay contributed to this article.
Photo: © Stephanie Anderson, Groupon
WHAT YOU DO:
1. Cut up comic-book pages into small pieces. Although there’s no correct way to cut the paper, irregular triangle shapes seem to work the best when collaging them onto the heels.
2. Clean heels, then apply Mod Podge. Mod Podge works best on relatively clean, vinyl heels. To be safe, take a wet cloth to the shoes and wipe away any dirt or scratches. Once clean, use a sponge paintbrush to apply a thin, even layer of Mod Podge to one section of one heel.
3. Collage paper pieces onto the heels. While the glue is still wet, apply one comic-book piece to the surface of the heel with your fingers. Then, using your index finger or the sponge paintbrush, smooth the paper onto the shoe, gently easing out any bubbles that form underneath.
Note: Excess buildup will occur when using your fingers to apply the adhesive over the paper. Like traditional white glue, this adhesive can easily be pulled off the skin or removed with a good soap-and-water scrubbing.
4. Continue to apply Mod Podge and paper pieces until both heels are covered.
5. Finish with sealant. Choose to seal the paper with a thin layer of Mod Podge, which doubles as a sealant and finish, or an aerosol sealant such as Krylon Crystal Clear Acrylic sealant spray.
For extra protection against the elements, both sealants can be used. First, apply a few layers of Mod Podge, letting each application dry, and then finish with a spritz of aerosol sealant and let dry overnight.
6. Click heels for joy.
Sara Tremblay contributed to this article.
Photo: © Stephanie Anderson, Groupon BY:
Deals in Chicago

Trending
Immersive Art Experience at Color Factory Chicago
233 South Wacker Drive, Chicago • 2.1 mi
$29
$24.65 with_code FUN
Color Factory - Chicago
LIMITED TIME OFFER! Save 56%! SeaWorld Orlando Tickets
7007 Sea World Drive, Orlando
56% discount_off
SeaWorld Orlando
Arcade Bar Fun at Astro Fun World
301 Illinois Route 59, Aurora • 29.5 mi
Sale Ends 3/13
$22.81 with_code FUN
Astro Fun World - Chicago
Deals in Chicago Other Deals in Chicago

Trending
AMC Yellow Ticket Deals & Snacks – Big-Screen Savings Anytime!
108 North State Street, Chicago • 2.6 mi
34% discount_off
AMC Theatres
Pottery Date Night Deals & Discounts for Two
1142 West 18th Street, Chicago • 0.6 mi
Sale Ends 3/13
$40.50 with_code FUN
Color Cocktail Factory
Trending
Lucky Strike: Up to 72% Off Bowling + Included Shoe Rentals
322 East Illinois Street, Chicago • 3.3 mi
61% discount_off
$38 with_code BOWL
Lucky Strike Bowling
