GROUPON GUIDE TO CHICAGO
Hoosier Mama Pie Company's Sort of Simple, Multi-Hour Apple Pie Recipe
BY: Cody Braun |Oct 15, 2013
 I’m not too much of a baker. I can wait while beers ferment and while cheeses brine, but I’m always vaguely suspicious of what’s happening in an oven when I’m not looking. I keep my baguettes to a sleek four or five ingredients.
A pie recipe the length and complexity of a New Yorker article felt beyond my abilities. But that’s exactly why I wanted to challenge myself and recreate one of Paula Haney’s pies. We recently talked to Haney, owner of Hoosier Mama Pie Company (1618 W. Chicago Ave.), about what it takes to make the perfect apple pie. To illustrate some of her points, she gave us a recipe from her new cookbook, The Hoosier Mama Book of Pie: Recipes, Techniques, and Wisdom from the Hoosier Mama Pie Company. The recipe (which we’ve included in full at the end of the article) weighs in at around 1,000 words, but I’ve done my best to prove that non-bakers need not be intimidated.
Luckily, it starts with a whole lot of not baking. Haney told us that she uses a lot of granny smith apples at Hoosier Mama. I don’t mind a fair bit of sweetness in a pie, though, so I chopped equal parts honeycrisp and granny smith apples with the doors to my kitchen open and Neil Young’s Journey Through the Past on the stereo.
I’m not too much of a baker. I can wait while beers ferment and while cheeses brine, but I’m always vaguely suspicious of what’s happening in an oven when I’m not looking. I keep my baguettes to a sleek four or five ingredients.
A pie recipe the length and complexity of a New Yorker article felt beyond my abilities. But that’s exactly why I wanted to challenge myself and recreate one of Paula Haney’s pies. We recently talked to Haney, owner of Hoosier Mama Pie Company (1618 W. Chicago Ave.), about what it takes to make the perfect apple pie. To illustrate some of her points, she gave us a recipe from her new cookbook, The Hoosier Mama Book of Pie: Recipes, Techniques, and Wisdom from the Hoosier Mama Pie Company. The recipe (which we’ve included in full at the end of the article) weighs in at around 1,000 words, but I’ve done my best to prove that non-bakers need not be intimidated.
Luckily, it starts with a whole lot of not baking. Haney told us that she uses a lot of granny smith apples at Hoosier Mama. I don’t mind a fair bit of sweetness in a pie, though, so I chopped equal parts honeycrisp and granny smith apples with the doors to my kitchen open and Neil Young’s Journey Through the Past on the stereo.
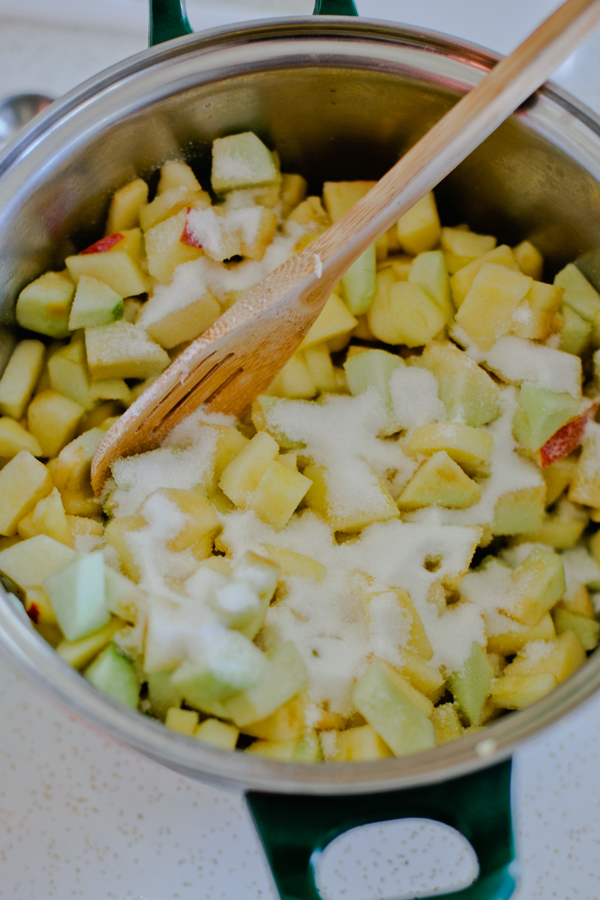 Next, you have to let those apples mingle with the sugar, lemon juice, starches, and spices that will pull out juice and give them added flavor. My apples seemed dry, and I was not at all confident any juice would come out of them. I’d skipped ahead and knew that I was supposed to have enough to put in a saucepan and bring to a boil, so I was concerned with the pathetic slick of juice at the bottom of the bowl.
I left it all in a colander over a bowl for the recommended half hour and went to plant some daffodil bulbs in the freakishly warm October afternoon. When I got back, I found the bowl full of sweet juice, the smell of the Chinese five-spice powder coming playfully to life. (A note on this stuff: there are lots of websites that will tell you what you can substitute for it, but you can find it at most real grocery stores. If you put a bunch of Altoids or cinnamon in here instead, the pie is not going to taste right.)
I’d been working on the pie for about 90 minutes at this point, and was well past “Are You Ready for the Country” and into Neil’s weird B-sides.
The next step was thickening up that juice. Since it was already full of the corn and tapioca starches (added along with the sugar earlier), bringing the juice up to a gentle boil for a few minutes turned it a nice caramel color and gave it a surprising thickness.
The whole house was already filling with the smell of the apple-and-spice syrup. This is around the time when people will start popping into your kitchen to see what’s cooking (possibly even if you live alone.)
After boiling, you have to cool the stuff back down in the fridge. More waiting.
Next, you have to let those apples mingle with the sugar, lemon juice, starches, and spices that will pull out juice and give them added flavor. My apples seemed dry, and I was not at all confident any juice would come out of them. I’d skipped ahead and knew that I was supposed to have enough to put in a saucepan and bring to a boil, so I was concerned with the pathetic slick of juice at the bottom of the bowl.
I left it all in a colander over a bowl for the recommended half hour and went to plant some daffodil bulbs in the freakishly warm October afternoon. When I got back, I found the bowl full of sweet juice, the smell of the Chinese five-spice powder coming playfully to life. (A note on this stuff: there are lots of websites that will tell you what you can substitute for it, but you can find it at most real grocery stores. If you put a bunch of Altoids or cinnamon in here instead, the pie is not going to taste right.)
I’d been working on the pie for about 90 minutes at this point, and was well past “Are You Ready for the Country” and into Neil’s weird B-sides.
The next step was thickening up that juice. Since it was already full of the corn and tapioca starches (added along with the sugar earlier), bringing the juice up to a gentle boil for a few minutes turned it a nice caramel color and gave it a surprising thickness.
The whole house was already filling with the smell of the apple-and-spice syrup. This is around the time when people will start popping into your kitchen to see what’s cooking (possibly even if you live alone.)
After boiling, you have to cool the stuff back down in the fridge. More waiting.
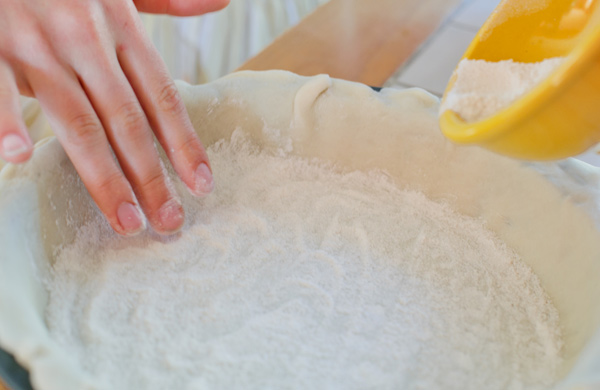 While that was chilling, I prepared the crust dust and crust wash, which maintain the firmness of the bottom crust and help brown the top crust, respectively. I also got the bottom crust situated in my pie pan and preheated the oven.
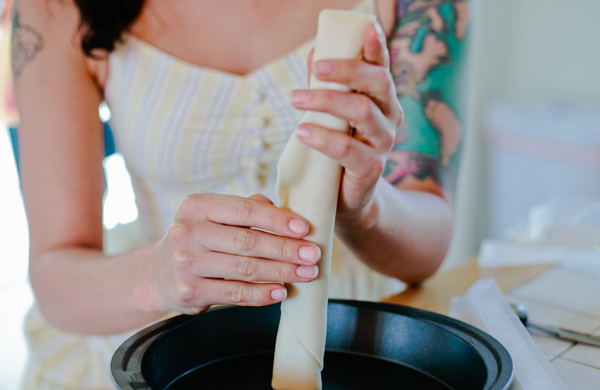
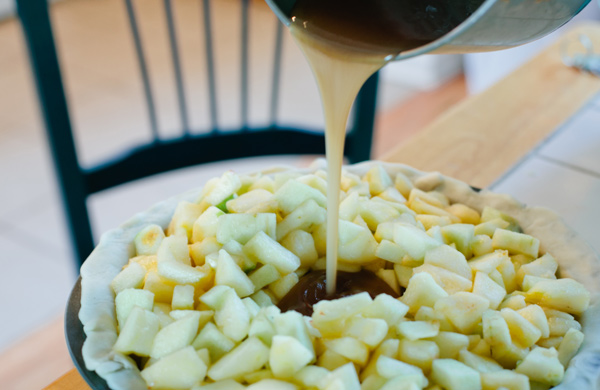
Getting the apples and cooled juice into the pie was easy. Personally, I rounded up Haney’s recommended tablespoon of butter for lining the tops of the apples. Then, I connected the top and bottom crusts. I started out crimping the edges too timidly, but that can leave the pie falling apart and without that nice crusty shelf of dough at the edge. Really get your thumbs in there and make sure you’re getting both halves of the crust. I debated cutting into the top crust of the pie festive seasonal shapes such as leaves or the inventor of the pumpkin-spice latte, but it seemed like too many things could go wrong. I’ll post pictures if I’m braver on my second attempt.
While that was chilling, I prepared the crust dust and crust wash, which maintain the firmness of the bottom crust and help brown the top crust, respectively. I also got the bottom crust situated in my pie pan and preheated the oven.
Getting the apples and cooled juice into the pie was easy. Personally, I rounded up Haney’s recommended tablespoon of butter for lining the tops of the apples. Then, I connected the top and bottom crusts. I started out crimping the edges too timidly, but that can leave the pie falling apart and without that nice crusty shelf of dough at the edge. Really get your thumbs in there and make sure you’re getting both halves of the crust. I debated cutting into the top crust of the pie festive seasonal shapes such as leaves or the inventor of the pumpkin-spice latte, but it seemed like too many things could go wrong. I’ll post pictures if I’m braver on my second attempt.
 Once the crust is attached, the whole thing goes in the freezer to firm up. You’ll want to look in there every once in a while and see if it’s doing anything exciting. But trust me, it’s not, and this pie takes long enough without the freezer opening every couple of minutes.
Finally, it is time to kiss this chilly pie that you’ve spent about four hours on and send it off into the oven (preferably on top of a baking tray, my pie was leaking rather seriously). Remember to turn it every 20 minutes or so, but again, no need to leave that door hanging open. The success of this pie is pretty much out of your hands at this point.
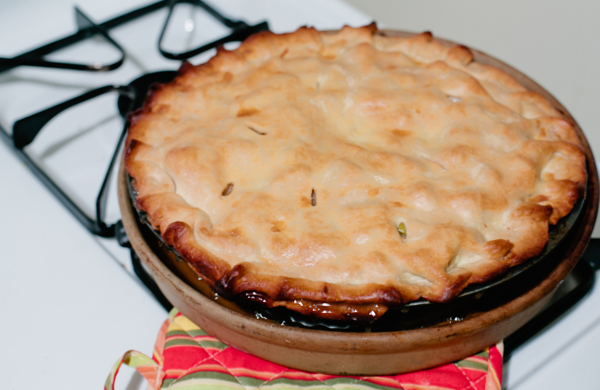
Then comes the first test. Take it out of the oven, and see if your kitchen smells amazing. It will. Mine also turned out surprisingly aesthetically pleasing. Not quite as nice as the ones at Hoosier Mama’s, but that is some fine crimping if I may say so.
Once the crust is attached, the whole thing goes in the freezer to firm up. You’ll want to look in there every once in a while and see if it’s doing anything exciting. But trust me, it’s not, and this pie takes long enough without the freezer opening every couple of minutes.
Finally, it is time to kiss this chilly pie that you’ve spent about four hours on and send it off into the oven (preferably on top of a baking tray, my pie was leaking rather seriously). Remember to turn it every 20 minutes or so, but again, no need to leave that door hanging open. The success of this pie is pretty much out of your hands at this point.
Then comes the first test. Take it out of the oven, and see if your kitchen smells amazing. It will. Mine also turned out surprisingly aesthetically pleasing. Not quite as nice as the ones at Hoosier Mama’s, but that is some fine crimping if I may say so.
 The hardest part, other than the five hours of work that will have gone into making the pie, is waiting another two hours to eat the pie. Haney recommends this in her recipe, and I can vouch that the pie will still be warm and delicious after two hours. Especially with a scoop of black-walnut ice cream on top.
It’ll feel pretty nice to sit down, too.
[Click here for Paula Haney’s full recipe.]
Photo: © Groupon
The hardest part, other than the five hours of work that will have gone into making the pie, is waiting another two hours to eat the pie. Haney recommends this in her recipe, and I can vouch that the pie will still be warm and delicious after two hours. Especially with a scoop of black-walnut ice cream on top.
It’ll feel pretty nice to sit down, too.
[Click here for Paula Haney’s full recipe.]
Photo: © Groupon BY:
Deals in Chicago

Half or One Dozen of Signature Cupcakes or $30 or 50 Voucher
1720 North Orchard Road, Aurora • 37.7 mi
Sale Ends 2/17
$15.39 with_code TOPDEALS
Smallcakes: A Cupcakery and Creamery - Aurora
$5 Off $25 eGift Card to Krispy Kreme
20% discount_off
Krispy Kreme® Doughnut Corporation
Indulge with 12 or 24 Delicious Mini Donuts
1067 East Lake Cook Road, Wheeling • 25.8 mi
Sale Ends 2/17
$10.53 with_code TOPDEALS
Mini Donut Factory
Deals in Chicago Other Deals in Chicago

Up to 55% Off on Infused Pastries at Prohibition THC Cafe
2113 South State Street, Chicago • 1.2 mi
Sale Ends 2/17
$10.53 with_code TOPDEALS
Prohibition THC Cafe
Indulge in Fresh, Homemade Quarter-Pound Cookies
Sale Ends 2/17
$8.10 with_code TOPDEALS
Foxxi Cookies
Enjoy Food and Drink / Drinks and Infused Baked Goods
18211 Dixie Highway, Homewood • 20.2 mi
Sale Ends 2/17
$16.20 with_code TOPDEALS
Wake N Bakery - Homewood
